


Friday, February 27, 2009
Long Weekend
Thursday, February 26, 2009
A Gift for the Jetsetter
 I stitched up a very simple luggage tag for my sister's birthday and dropped it in the mail this week. It was a wee bit past her birthday, but I'm hoping my tardiness will be forgiven. She travels lots and lots for her job, which requires her to talk wind.
Tuesday, February 24, 2009
Tagged: Sixth Picture, Sixth Folder
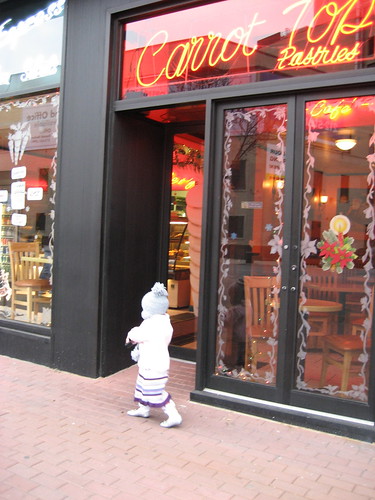
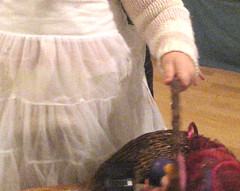
This is the picture I found in the sixth folder, in the number six position. It shows Miss Kinder, at age 2.5, walking just outside our front stoop and past the Carrot Top Bakery in Inwood, NYC. This bakery has great carrot cake as you might imagine, but my memory of it is the giant cookies that lined the case inside, and of Madeline who worked there. This wonderful woman would wave Miss Kinder inside and tell her to point to any cookie she wanted. And each year on Miss Kinder's birthday, this same lovely woman would have Miss Kinder decide what color flowers she'd like on a small carrot cake which she would then decorate as a gift to her.
How To: Rolled Hem Hankies
 I've been wanting to make hand rolled handkerchiefs for a while, because they are lovely and really handy. I used the Purl Bee tutorial which has great step-by-step photos. Each handkerchief took about an hour to hem, and the result was well worth it. I am gifting these to the friend in my life who I know uses hankies everyday, in the hopes they will be most appreciated.
 - 9" x 9" cotton squares in the fabric of your choice
- thread -- match well for a hidden hem look, or a contrasting one if you prefer
- size 9 or 10 needle
- make sure you are hydrated. The hem requires you licking your thumb and index finger to roll the hem tightly as you go along. You could use a wet sponge too, but where's the fun in that?
- Lick your finger and thumb and roll the fabric toward you, with the wrong side of the fabric facing you.
- Slip stitch the rolled hem. Every 1/4 inch you'll catch a few of the threads from the backside just under the roll. This is the thread that will show on the front of the hankie if you choose a contrasting thread. See the Purl Bee tutorial for great pictures of this.
- Take your time on the corners. They are a little tricky, as you are going to roll the next edge into the one you are finishing and tucking it together. It's hard to explain, but when you get to the edge it should make sense. My first corner was a bit wonky, but I got the hang of it as I kept going.
- When you finish the edges, embroider a little design or initials if you like.
- Iron the hankie, but not the hem. You want it to be rolled and stay that way.
Monday, February 23, 2009
A Cure for February

Saturday, February 21, 2009
10 of my favorite craft supplies for kids

- mod podge - this is fun and easy to use. kids can make collages on paper, cardboard forts, tins for their treasures and just about anything else there is. I prefer the glossy, but they sell a matte version as well. You can find it in any craft shop.
- tape - I've talked about this before, so I'll be brief and simply say that you can never have enough tape. Feel free to check out the tape roundup I did, here.
- embroidery floss - another easy to find item (any craft or fabric store will carry this) it makes a great first thread for tiny hands. We use it for embroidery work as well as for beading necklaces and bracelets.
- silver ball chains - these are inexpensive and make great chains for lots of different pendants.
- alphabet stamps - we have a few sets of these, and they are great for my new reader & writer. She likes spelling out words with them and embellishing letters and just about any other project.
- postage stamps - it's always a good idea to ask at the post office what kinds of pretty stamps they have on hand. That said, I love the idea of buying up older stamps and using them in combination to get the postage just right.
- bakers twine - a simple and pretty way to gift-wrap. Use tissue paper for the gift and then wind around like you would with ribbon and tie a nice bow.
- wooden doll bodies - kids can paint their own characters and use ribbon, cloth or ricrac to decorate the bodies.
- stickers - great for letters, affixing to best friends, and for countless other uses your kids will think up. I love these sweet faces from thesmallobject.
- oil cloth - Use it as a dropcloth on the floor for finger painting or cover a craft table, or countless craft projects. Here's a list to get you thinking.
Thursday, February 19, 2009
10 indoor activities to do with kids
 Scavenger Hunt. Make a list of things to find and give a basket to your kids to gather them in. For toddlers, draw shapes or simple items (a ball, something green, something fuzzy, etc) Older kids like more of a challenge (something noisy, something smaller than your pinky nail, something with buttons). You can also hide clues around the house and draw a map to where they can be found, like this. Don't forget the prize at the end!
- Use an old shoebox or packing box to make a dollhouse. You can cut your own dolls out of paper, or download some from this list and have fun decorating the room with origami paper or pages from magazines. Use fabric scraps for rugs and blankets.
- Build a fort. These are always a hit, but adding some height can make for more excitement. Three plastic stacking bins in a closet make a great perch, with a kitchen step-stool as the way up. The shelf above them in the closet is perfect spot for keeping a notebook and crayons, a snack, and a flashlight.
 Encourage your budding photographer. With some instruction on being gentle, and using the strap on the camera so they don't drop it, let them take your digital camera around the house and document their favorite things. Ask them to set up photoshoots, or make a well-lit area for them. Import the pictures and make a memory book, or have them write a story to go with their photos.
- Swap ATC's with your kids. I've gushed about this before, but we've had a great time making these using markers, magazines, scissors and glue. But the possiblities are endless. Try a new technique like crayon resist painting, or drawing from real-life.
- Play a game of crab soccer. The rules are simple, and it's great when the kids get squirrely. Sit on the floor and then lift yourself up with your hands and feet, like a crab would. Using only your feet, you try to get the ball past the other team and into their goal.
 Have a picnic or elegant lunch. Set up a blanket on the floor or a short table with cushions. Ask them to design the menu for the occasion, and set the table as they would like.
 - Make a magic potion. Dig out the mixing bowls, wooden spoons and measuring cups, and give your kids an assortment of potion ingredients: water colored with drops of food coloring, spices, sprinkles, flour, jello, ice cubes, dry pasta, couscous and a few goldfish or soup crackers are some ideas.
- Bring the outdoors indoors. Take an underbed storage bin, fill it with snow and bring it inside. Give them some spoons, scoops, cups and some little people, animals or cars. Or, fill the bin with water or sand-- the same rules apply.
 Do something silly. Kids get stir-crazy, too, and sometimes it's great to let them "get away" with something they couldn't normally do. Give them a skein of yarn and see how long they can make it go around the house. Encourage them to wrap it around the legs of tables and go up and down stairs to make it even longer. Also in this category are pillow fights, jumping on the bed and lining up all the stuffies on the staircase.
- Bonus! Newspaper sculptures. I haven't tried this one yet, but rolling newspaper into tubes makes a great medium for sculptures of all shapes and sizes. I've seen these tubes used for making the frame of a fort or teepee, which could be a really fun way to make a fort (see #3!).
Wednesday, February 18, 2009
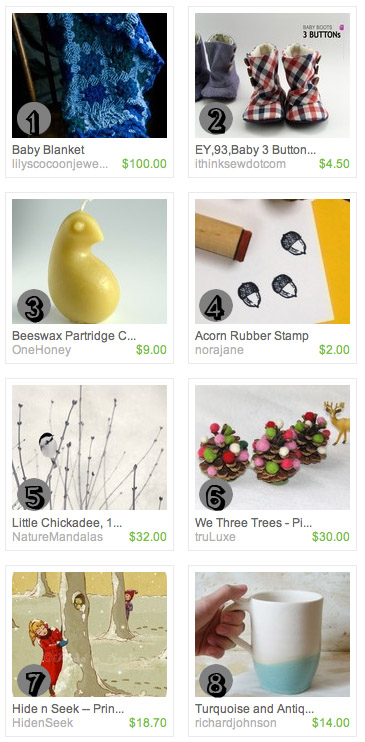
Etsy finds: Wintery Mix
It's the time of year when winter can start to feel long. It hasn't happened to me yet, but surely it will. I'll wish I were somewhere warm, where every step doesn't need steadying. For now I'm still enjoying winter's grip. Here are some beautiful etsy finds that feel very wintery and very wonderful.
Tuesday, February 17, 2009
ATC's and the Story Behind the Blog Name
Monday, February 16, 2009
Hard Boiled

Fill a pot with enough water to cover the eggs by a couple inches.
Put the eggs in the cold water and turn the range on high.
After 12 minutes, take the pot off the burner and let sit for 5 minutes.
Pour out the hot water and fill the pot with cold water (a few ice cubes won't hurt).
Add a big splash of white vinegar to the water. This is what makes the shells come off easily.
Dry and mark with a permanent pen.
Friday, February 13, 2009
Forever 21 to Forever 5
Thursday, February 12, 2009
Tucked Away
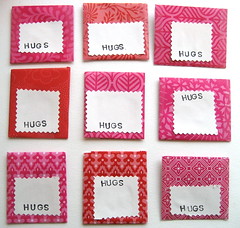 These are the envelopes I made for Miss Kinder to address and tuck the felt love nuggets into for tomorrow's Valentines Day party. I settled on "hugs" and I think they look pretty, but somewhere in the back of my mind I am wondering if I could have thought of some other words to change them up a bit. At the end of the day, hugs are always great in the five-year-old world.
Chewy on the Inside, Crunchy on the Edges
Wednesday, February 11, 2009
On Being Brave
There were strangers along the way who really helped. Not just the doctors. I'm talking about the woman from a PPD support group who walked me to the subway and rode it with me, to my neighborhood so far out of her way. This was wonderful because one of the symptoms I had was feeling disoriented, and not exactly knowing where I was going or sometimes not being sure of where I was. She told me that being able to help someone else showed her how far she had come with her own struggle. I understand this now.
I keep an eye on PPD research and recovery, especially through the wonderful blog, Postpartum Progress. She recently linked to this entry on a blog called Magpie Days, where a woman shows two photos of her and her son on his birthday. The first, when she is deep in the clutches of PPD, and the second, when she's back to herself. I know this well. Speaking up is brave.
Kinder Love Nuggets
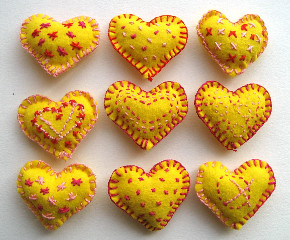
I had quite a bit of yellow felt leftover from the nesting doll project, even after making 2 sets of them. I decided to spice up the valentine scene by making these puffy little love nuggets for Miss Kinder's class. She has been agonizing over which friend will get which one. These couldn't have been easier to make: I made a template out of a manilla folder, cut out 30 of them (for the 15 children in the class) and then got out the dark pink, light pink and red embroidery thread. I stitched the fronts up, lined up the back with a little puffy stuffing between them, and stitched them up with the trusty blanket stitch.
Etsy Finds: The Way Life Should Be


Tuesday, February 10, 2009
Fire
 Poor Victoria. I don't even know what to say. If you would like to do something to help people who have lost everything in the bushfires, visit Handmade Help and buy something. Proceeds will go to help victims of this awfulness as they try to rebuild their lives.
The Universe Sensing my February Power Animal
Antarctica
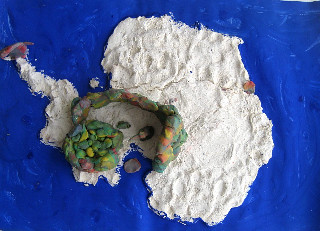
I don't think I could give you a very good rational for why the first continent on the Kinder-Curriculum is Antarctica. Maybe it's easy because it doesn't have many inhabitants, seasons, cuisines or languages. The good news is that the wrap-up of the work on said continent was a dandy art project with clay and paint, and now we are the proud owners of a map sculpture complete with a gigantic penguin nest, fortress wall and mama penguin at the end of the peninsula trying to find her way back to her babies.
Monday, February 9, 2009
Mandate
I found this in the kitchen this morning. My other half clearly had something in mind for me today. I hope I can live up to it.
Music for a Winter Monday
Come On Up To The House, Tom Waits
Elephant Gun, Beirut
Seven Days of the Week, They Might Be Giants
Boy With A Coin, Iron & Wine
Needle in the Hay, Elliot Smith
Ease Down The Road, Bonnie "Prince" Billy
Saturday, February 7, 2009
All Things Hedgehog


Friday, February 6, 2009
Valentine Fever

We are gearing up for the weekend, and this one promises to be filled with kinderthings. Next week marks the 100th day of kindergarden, which is a great reason for celebration and reflection. Miss Kinder has her 100 things picked out, and has settled on the design. Of course you will be seeing the finished project. The other item on the weekend agenda is making the 15 valentines for her classmates and teacher. We've done lots of practicing -- cutting out paper hearts, writing names, gluing beads and buttons, and even some fabric hearts stitched to paper. None of these seems quite right, and since the felt doll project yesterday, I am thinking it might be nice to stitch up something tiny, lovely and puffy for her friends.
Thursday, February 5, 2009
Nesting Doll Love
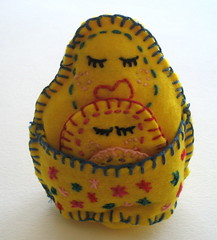
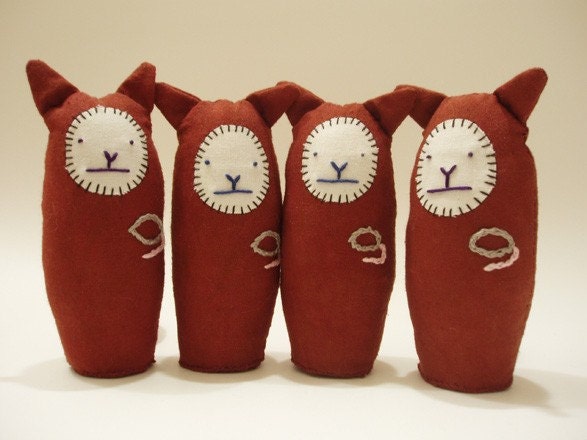
The littlest member of this Belfast crew, the one we shall refer to here as LEB, recently discovered the joy of matryoshka dolls and has been requesting some of her own. I found this great pattern for a felt version, and figured it would give me a chance to make her happy as well as figure out how to do a blanket stitch (that's the one on the edge that looks really pretty when done properly.) I used yellow felt and lots of different embroidery thread, mostly letting her pick the colors. She hasn't let go of them yet, and won't let anyone hold them. So that makes me feel pretty darn good.
Maize Hutton, who designed the dolls, has the free pattern for download on her site if you want to give it a go.
Wednesday, February 4, 2009
Bagel Experiment, Take One
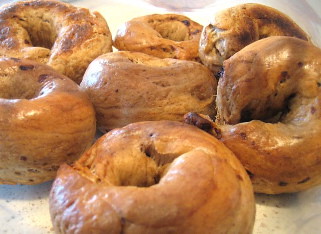
Cliche, yes, but so real: I miss the bagels from the city. I even miss the ones from the donut carts; it's that bad. Luckily, we have the internet and a lot of energy for this kind of thing. I set out to find some recipe that sounded promising, and settled on this. The hard part about making bagels is not the boiling, which is the part that kept me from trying it sooner. It is the kneading -- this is some tough dough. We don't have a mixer to do the work, and I'm not exaggerating when I tell you we kneaded the dough for about an hour before it came together. In hindsight, this was probably the fatal flaw. And I think next time I'd add another tablespoon of water or two and try to get the kneading to 30 minutes. The boiling was easy (just drop them in for a few minutes per side) and then into the oven they go. We all gave them high marks when they were warm. The issue with these was the next morning, when they were rock hard in the ziplock bag I had stored them in. Again, I think they were kneaded to death. But, aren't they pretty?
Reworking Crayons

With a string of cold, grey and snowy days, the craft scene here seems to have blossomed. Here are some crayons the girls made with about 40 crayons hand selected from their box of roughly 1,000,000 crayons. They liked peeling the wrappers off, but their favorite part seemed to be snapping them into tiny pieces. We sorted them by color and then I gave them a muffin tin to fill however they wanted. To melt them, just heat the oven to about 150 degrees, then turn it off. Put them in the warmed up oven for 15 minutes and take them out. They will be really soft, but not totally melted. Let them dry and pop them out of the muffin tin. Presto.
Tuesday, February 3, 2009
Sneaky Little Elephant
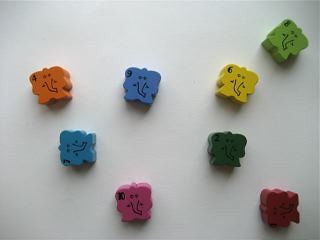
Little 2.5 snuck off to the my photo taking area, and set this up. I had to snap a picture because it was so pretty, I wish I'd done it myself.
Monday, February 2, 2009
kid artist trading card swap

This project has all the elements that bring joy to my five year old. Sending mail, receiving mail, and drawing/painting/gluing paper. Read the specifics here, but know this: if you have a child age 4 or older, you can sign them up to participate in this swap, easy peasy. They will create five small artist trading cards of their own fancy (they have to be 2.5" x 3.5" and no bigger or smaller). They will receive five cards from five other kids in exchange. I can't wait to see what is made here, and what lands in the mailbox.
eco tawashi
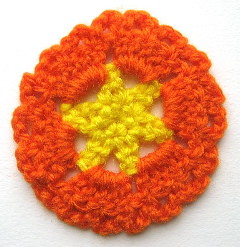
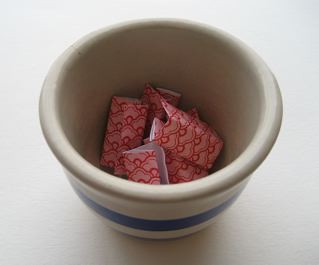
Maybe you already know this, but you can wash dishes really well with a simple scrubber made from acrylic yarn. It's called an eco tawashi.
I found a set of acrylic crocheted coasters at the thrift store (pictured) and repurposed them as our first eco tawashi experiment. The review: they are like soft scouring pads that do a great job on nearly everything. I've read that you don't need to use soap, but the jury is still out for me on this one.The best part for me, aside from how cute they can be, is that they can be washed with the laundry. Never face that stinky sponge smell again.
Instructions on how to make your own eco tawashi are available here, if you already know how to crochet. I am not ready for this tutorial, though, because the last time I crocheted anything it was for a badge in girl scouts around the fifth grade.
I am going to give it a go, using this youtube video on how to crochet in a circle. Perhaps this is insanity, but I'll show you how I do.
If you have the eco tawashi itch, but don't want to make them, etsy.com has some really cute ones you could buy, or keep your eye out for something at your local thrifty shop.
scavenger hunt
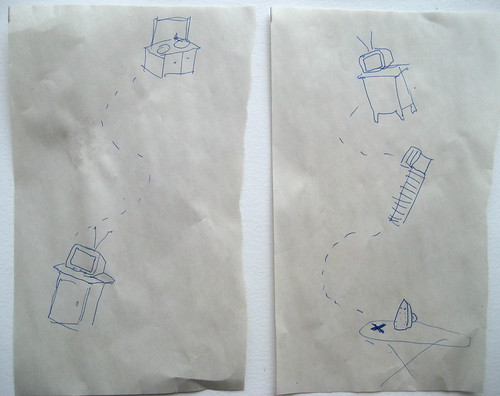
Finding things always makes the girls happy. Easy-to-follow maps, like this one Ethan drew, give you time to reheat a cup of coffee and almost read a whole article in the newspaper. The longer you make it, the more Sunday funtime you get.
Rainy Day Woman

peek-a-boo, sourdoo

Did you know that to make sourdough bread, you need a starter? And did you know that this starter takes time to cultivate, and you keep adding to it, using it, adding more...It's good to date the starter, so you know its birthday. There are starters dating back to the civil war, passed down generations. Ethan started ours sometime in January, 2009, and we've had 4 loaves of it so far. I hope he can pass it down to our girls when they get start their own families. This idea is so sweet, it makes my heart hurt.
Sunday, February 1, 2009
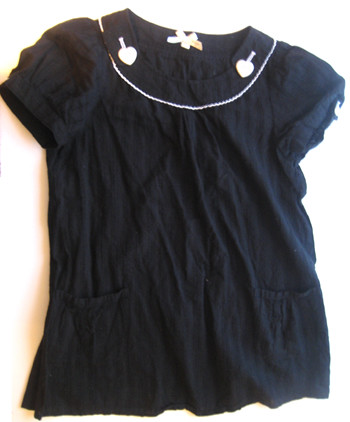
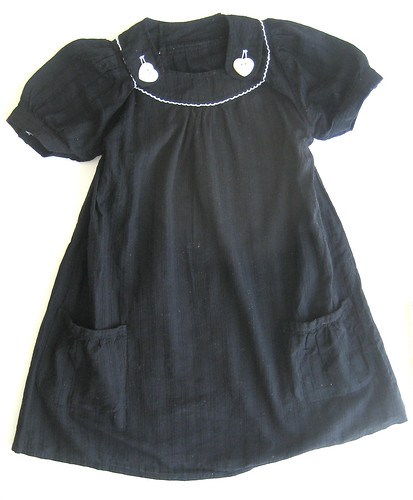
Trial and error: my first sewing project
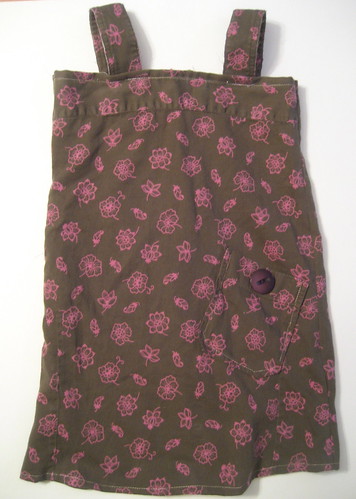
As promised, here is a photo of the first dress I sewed on the machine using the men's-shirt-to-girls-dress tutorial. I learned a lot during this project. The straps from the tutorial didn't work for me. They were way too short for 5 year old shoulders. So I took the collar from the shirt scraps pile, cut it exactly in half and voila! I also reused the pocket that I had to seamrip from the shirt and stuck it on the front of the dress because a girl needs a place for stowing treasures.
scarf hat
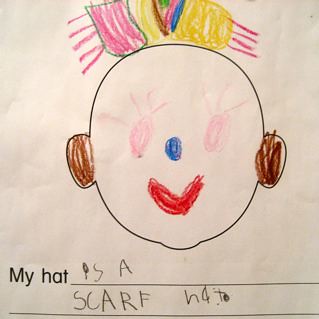
Each week, many pieces of paper come home from kindergarden. This one is my favorite of the bunch I unstuffed from underneath the snowpants in the backpack this week. I would very much like this hat.
change chores
On the weekends we do change chores. I write up a few things that need doing on some paper, fold them up and put them in a dish (or bowl, if things are really out of hand) and we all draw one. If you are five years old, once you are finished, you get all the change that mama and daddy have kicking around.
thrifty finds
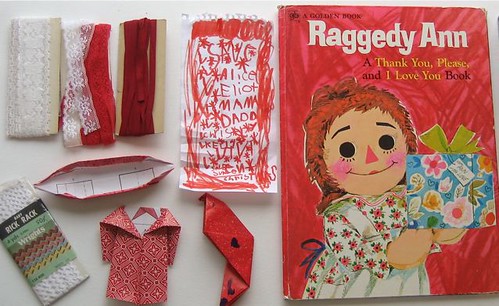
Yesterday's thrift finds included this gwonky copy of Raggedy Ann, an origami-a-day calendar, and a $2 bag stuffed with lace, ric rac and embroidery hoops. Also, I love this list that my daughter made and it goes so nicely with all these valentiny things.
Cupid strikes again


